Understanding Positive and Negative Exponents Lesson Plan 8th Grade


Discussion/Introduction

It is imperative that students have an understanding of the logic of positive and negative exponents before they can start multiplying and dividing with them. This is a foundational lesson that dives into not only how to convert negative exponents to positive exponents but also teaches the logic behind this conversion.

Objective

Learning Objectives/Goals

  • Students will be able to convert integer exponents into standard form.
  • Students will have an understanding of and be able to work with negative and positive exponents.

Supplies

Supplies Required

  • Base ten blocks or linking cubes (100 per group if you plan on each group building all the way to a 4 x 4 x 4)
  • Multiplication table (25 x 25) (1 per student)
  • Integer Exponents Intro Worksheet
  • Exponents Match Up Cards (either on-level or supported version)

Methodology/Procedure

Methodology

Anticipatory Set (Building Understanding with Blocks)

  • Have students work with their table groups for this activity.
  • Give each table group base ten blocks (or linking cubes if you have enough)
  • Have students build (as a group) squares (imagining the blocks are 1-dimensional) with the following areas:
    • 1 square unit
    • 4 square units
    • 9 square units
    • 16 square units
  • Discuss how they decided to build the shapes.
  • Also, discuss where these numbers appear on a multiplication table. Have students color in all numbers on the multiplication table that could result in perfect squares.
  • Point out that each perfect square is made by multiplying a number by itself, or taking a number to the second power.
  • Pass out the Exponents Intro Worksheet. Here’s a sample side one of this worksheet:

Integers WS1 Part A

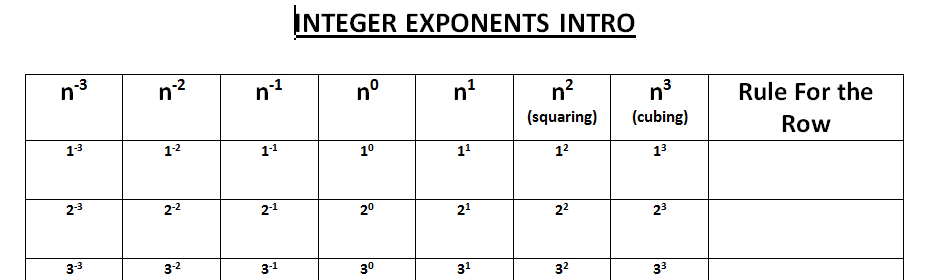
  • Fill in the squared column for the table on the Integer Exponents Intro Worksheet.
  • Next have the students construct (using the blocks already set up) cubes with the following dimensions:
    • 1 x 1 x 1
    • 2 x 2 x 2
    • 3 x 3 x 3
    • 4 x 4 x 4
  • Discuss how they decided to build the shapes.
  • Discuss with the students why these numbers do not appear in a straight forward pattern on a multiplication table. Guide them to the understanding that a multiplication table only has two values being multiplied together. I have included a challenge investigation in which students can use a multiplication table to find cubes.
  • Point out that each perfect cube is made by multiplying a number by itself and then by itself again, or taking a number to the third power.
  • Fill in the cubed column for the table on the Integer Exponents Intro Worksheet.
  • As a class, have the following discussion:
    • Let’s look at the two’s row. When we have 21, what is our base? What is our exponent? What does this integer exponent mean? What is 21?
    • Would this hold true for all other integers to the first power?
      • Have students fill in the “n1” column.
    • Can anybody see a pattern happening in the two’s row? What is the rule for the row?
      • Students should point out that each column is double (or times 2) the column to the left of it.
      • Write this rule on the worksheet for the two’s row.
    • When we have 20, what is our base? What is our exponent? Let’s look at our rule for this row. What number, when we double it or multiply it by two, gives us 2?
    • Would this hold true for all other integers to the zero power?
      • Have students fill in the “n0” column.
    • Let’s go back to the two’s row. When we have 2-1, what is our base? What is our exponent? Let’s look at our rule for this row. What number, when we double it or multiply it by two, gives us 1?
    • How are 2-1 and 21 related?
      • Help them understand that they are reciprocals.
    • When we have 2-2, what is our base? What is our exponent? Let’s look at our rule for this row. What number, when we double it or multiply it by two, gives us ½?
    • How are 2-2 and 22 related?
      • Help them understand that they are reciprocals.
    • When we have 2-3, what is our base? What is our exponent? Let’s look at our rule for this row. What number, when we double it or multiply it by two, gives us ¼?
    • How are 2-3 and 23 related?
      • Help them understand that they are reciprocals.
    • Guide the students through the same reasoning with the one’s row, the three’s row and the negative two’s row.
    • Have the students work with their group to complete the remaining rows. Check in with the class upon completion.
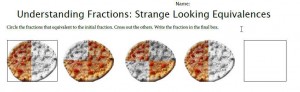
  • Flip the Integers Exponents Worksheet over and discuss the alternative approach to negative exponents. Here’s a sample from side 2 of this worksheet:

Integers WS1 Part B

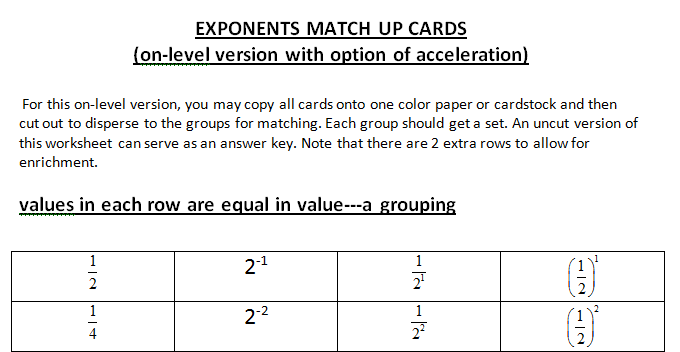
  • Get students into groups of 3-5 students for the Exponents Match Up activity. There are two different versions of this activity. There is the on-level version where student groups will be given 32-40 cards (all the same color) and will be asked to make 8-10 groups comprised of 4 cards with equivalent values. The supported version can have up to 32 cards yet would be photocopied on 4 different colors of paper to help make the activity a bit easier. No grouping (in the supported version) will have more than one card of the same color. This activity does require teachers to cut the match up puzzle pieces beforehand. The filled in 4-column chart can serve as the answer key. Equivalent terms are organized by row. Here’s a sample from the on-level version:

Exponents Match Up

  • Go over the answers as a group to check for accuracy at the end. An alternative option, if you do not need to use the cards again for another class, you can have the students staple together the pieces or organize them on a poster paper to use this activity as a group assessment.
  • Homework/Review practice can be worksheets including work with negative and positive exponents.
Download Lesson Plan

Download Lesson Plan

Common Core Standards

Common Core Standard Addressed:

CCSS.MATH.CONTENT.8.EE.A.1
Know and apply the properties of integer exponents to generate equivalent numerical expressions. For example, 32 × 3-5 = 3-3 = 1/33 = 1/27.

Web Resources/Further Exploration

Common Core Standard 3.NF.1 Lesson Plans

Common Core Standard 3.NF.1 Lesson Plans

Under 3.NF.1, under the first item of 3rd Grade Number and Operations– Fractions, the Common Core State Standards for Mathematics reads:

3.NF.1 Understand a fraction 1/b as the quantity formed by 1 part when a whole is partitioned into b equal parts; understand a fraction a/b as the quantity formed by a parts of size 1/b.


Lesson Plans on this Topic

  • Fractions and a Secret Code: Fractional Notation

Third Grade Fractions Lesson Plan: Learning Notation


Fractions are a secret code

Fractions are a secret code

Discussion/Introduction

Third graders have a magnetic relationship to secret codes. Anything to do with secret writing, dangerous espionage and top-secret missions brings up the energy in the room several points. Fractions tend not to have that same magnetic appeal. In fact, 1/b notation can look so strange to third graders that the first sight of a page filled with the stuff makes them want to turn their brains off.

If it’s taught wrong, that is to say. Taught right, though, with just the right amount of fun mixed in, third grade fractions can be just as exciting as a top-secret mission in dangerous territory with a good dose of secret codes mixed in.
Download lesson
My free lesson plan, aligned with the Common Core (3.NF.1), is a slightly nontraditional but completely fun look at fractions for third graders. There’s no reason to make fractions dry book learning; let them be a game, a ‘break from the hard stuff’.

Objective

That students would gain familiarity with fractions and learn basic fractional notation: that 1/b is the quantity formed by 1 part when a whole is partitioned into b equal parts and that a/b is the quantity formed by a parts of size 1/b. That they would learn to work as a team, helping the weakest members in order to gain united success.

Supplies

  • 1 piece colored folding paper for each student, or construction paper rectangles
  • Five flashcards for each student: ½, ¼, ¾, 1/3, 2/3 portions of a circle (printable here)
  • One set of large flashcards for teacher, with ½, ¼, ¾, 1/3 2/3 written out.
  • ‘Initial Assignment’ missive paper, one copy of each (printable here)
  • Secret missive paper, enough for the class; two types (printables here and here)
  • Group prizes or ‘winning team’ paper headbands, enough for half the class.
  • Math notebooks or writing paper & pencils for each student.

Methodology/Procedure

Tell your students that you’re not going to do much regular math today; today is going to be a fun day. Go on to explain that instead of doing regular arithmetic and adding or dividing (or whatever yesterday’s topic was) you’re going to learn something really cool: a secret code that they’ll be able to use to write important math messages with. And that if they learn it well, they’ll be able to use it right away, in an exciting game that they can play in the classroom.

But tell them that before you start that, you’d like to do a brief review of fractions. Ask them what a half is (one of two equal parts) and how many halves are in a whole (2). Ask what a third is (one of three equal parts) and how many thirds are in a whole (3); then go on to fourths. If they have forgotten any of this or it seems even a little rusty, give them a bit of a refresher. Give them each a rectangle and as you call out ‘half!’ ‘quarter!’ or ‘third!’ have them race to fold it and display the portion you called.

When they’ve got it, tell them they have, and tell them you’re proud of the speed with which they can fold. Tell them now they’ve done their work, so now it’s time to go on to secret codes and the new game.

Ask them what they know about secret codes. Give them a chance to talk about what they know; the final thought you want to come up with—and you can just state it yourself if no-one has similar thoughts—is that a secret code is a way of giving information to one’s friends in a way that one’s enemies can’t understand.

Tell them that another special thing about secret codes is that they’re often short and concise, allowing their writers to put a lot of information in a very little space. Then tell them that now you are going to show them how to write fractions in secret codes.

Draw a circle, and color half. Then, next to it, write ‘half’ on the blackboard. Tell them this is how you write half in plain English. Ask them if it’s easy to read and understand (yes). Ask them if it’s short. (Not too long, but it takes the space of four whole letters).

Ask them how they would make a secret code that would express half.

Encourage them to experiment with different possibilities in their math notebooks. After a few minutes, ask whoever has an idea to come forward and draw it on the blackboard. Provide chalk for each child, and have them write down their secret codes.   Ask whoever has a unique notation to explain their secret code and why they chose it to the class.

Then tell them that there are people called mathematicians who decided what the main secret code was going to be for math, and you’ll tell them that secret. Write ½ on the blackboard, next to the word half.

Ask them why they think the mathematicians chose that way. After they’ve had a chance to express their ideas, show them how they can read it as ‘one of two equal parts’, and that the number on the bottom is the number of parts you’ve divided the whole in; the top, the number of those pieces you have.

Ask them to copy ½ down into their math notebook. Then draw another circle on the blackboard, divide in four quarters, color one quarter, and write the word ‘quarter’ next to it. Tell them this is a quarter, and this word is how you write quarter in English. Ask them whether they have any guesses as to how you would write it in math’s secret code.

If you have any volunteers, have them come up to the blackboard try out their ideas, and explain them to the class. Validate each idea, and if anyone writes ¼, tell him that he was thinking in exactly the same way as the mathematicians were. Write ¼ next to your word ‘quarter’.

Go through the same procedure for 1/3rd; here, thought should be united enough that you should be able to call just one confident child up to the blackboard to write down 1/3 as his idea and explain how he got it.

Now draw another circle on the blackboard; divide it into thirds, but instead of shading 1/3 , shade 2/3. Write “two thirds” and ask your students how they’d write it in math secret code.

Ask volunteers to come up and share their ideas with the class. If you get 2 1/3, tell the writer that it is a good idea, but the problem is it looks the same as the way you’d write two wholes and a one third, and draw a picture of that with circles.

When someone comes up with 2/3, tell him he was thinking just like he mathematicians who decided this code.

Pass out the flashcards, and tell the students that when you display your secret code flashcard you want them to pick up and show you the equivalent pie flashcard, without looking at any of their classmates. Go through your cards in random order at least twice; more if some students are having difficulty.

Then tell them it is time for the game. Divide the class in two teams, each with a team leader who has a good grasp of what you’ve been teaching. Tell them that the team that wins will get whatever prize you’ve prepared, or get the honor of wearing ‘winning team’ headbands for the rest of the week in school.

Tell them that when soldiers or intelligence agents use secret codes in war, it is very important that every member of the team is able to do his part well and convey the message without losing any of the meaning. Ask what happens if one of the people passing on a message forgets the secret code (the message is lost). Tell the teams that the same thing will happen if one of their members musses up or forgets the code: they will lose all chance of winning.

Give them five minutes to review the secret code together, and tell the leaders they are responsible for making sure every member of the team understands how to write and decipher the secret code of fractions.

When they are ready, set each team up as a chain. The game will be conducted like telephone; you’ll give the leader of each team a picture with six circles, each divided into different fractions with different parts shaded. They’ll ‘translate this’ on to their missive sheet, writing in math’s secret codes. Then they’ll fold this paper up and pass it to the next team member, who will take it, color and shade the circles on his paper, and pass that paper on to the next team member

Teamplayers will have been given circle and secret missive papers, alternately. You may want to walk up and down the lines checking the work; your responsibility is not to make sure they are doing it correctly, but just that the ‘secret code’ writers are not writing circles and the circle drawers are not writing code.

The first team which sends the message down the line correctly wins. When the message goes down the line, you pick it up and return it to the first player. He compares it with the original paper you gave him. If they are the same, they have won. If they are not correct and the other team has not yet won, he can walk down his line, checking the papers, and find where the mistake began. If he corrects that mistake, the message begins again at that person and is passed on again down the line until it comes to the end.

To avoid bad feelings and loser mentality, you can let the other team continue working till they’ve got the message passed down correctly also, and offer them a consolation prize or ‘silver medal finalists’ headbands.

Tell your students they have learned something incredibly useful today; a secret code with which they can communicate with other math people all over the world.

Don’t forget to encourage them to practice this special code  any chance they get. One way of doing this would be by spending some time on our fun fractions activity pages.  Visual Fractions is a simple but very enjoyable interactive web application where students can type in any fraction and see it formed before their eyes. The link Online Fraction Games  will bring your students to a number of other fraction-based games; some a little above their level, but others that they are ready to tackle.


Download Lesson
adobe_pdf-116x150

Common Core Standards

In 3.NF.1, the Common Core State Standards for Mathematics reads:

3.NF.1 Understand a fraction 1/b as the quantity formed by 1 part when a whole is partitioned into b equal parts; understand a fraction a/b as the quantity formed by a parts of size 1/b.

Test Border Paragraph

Lorem Ipsum Dolor Ipset Lorem Ipsum Dolor Ipset Lorem Ipsum Dolor Ipset Lorem Ipsum Dolor Ipset Lorem Ipsum Dolor Ipset

Lorem Ipsum Dolor Ipset Lorem Ipsum Dolor Ipset

Lorem Ipsum Dolor Ipset Lorem Ipsum Dolor Ipset

Lorem Ipsum Dolor Ipset Lorem Ipsum Dolor Ipset Lorem Ipsum Dolor Ipset

Common Core Standard 2.G.3 Lesson Plans

In 2.G.3, 2nd grade geometry item 3, the Common Core State Standards for Mathematics reads:

2.G.3 Partition circles and rectangles into two, three, or four equal shares, describe the shares using the words halves, thirds, half of, a third of, etc., and describe the whole as two halves, three thirds, four fourths. Recognize that equal shares of identical wholes need not have the same shape.

Lesson Plans on This Subject:


2nd Grade Fractions Lesson Plan Equivalance

Download Lesson

equivalent-fractions-picture


Discussion/Introduction

In first grade our students were briefly introduced to fractions—or, more specifically, halves and quarters– as equal divisions done on rectangles and circles. They identified halves and quarters and divided their own samples into two or four equal parts. The emphasis was on neat, symmetrical divisions that made it easy to check equivalence.

In second grade, though, we get to work with the concept of strange looking equivalences— portions which are equal but which are different shapes. This concept will probably be counterintuitive to many of your students, but it is an important concept nonetheless: a crucial part of their understanding of space, area, and sameness.

This lesson plan gives a brief review of halves and quarters, introduces the new kid on the block—thirds—and goes on to discuss strange looking equivalences and what it means for portions or fractions to be the same.

2nd Grade Fractions: Strange Looking Equivalences

Objective

That students would gain familiarity in partitioning circles and rectangles in two, three, and four equal shares, and would understand that equal shares of  identical wholes need not have the same shape. (Common Core 2.G3)

Supplies

  • One orange
  • Construction paper, pre-cut into a quantity of identical rectangles and circles: 3 circles and 5 rectangles, preferably in an assortment of different colors
  • Markers
  • Scissors
  • Scotch Tape
  • Beads or other small math manipulatives (12 per student)

Methodology/Procedure

Start class by reviewing fractions, as learned in first grade. Tell your students that you like eating orange every morning, but you only have one orange for today and tomorrow; ask them how much orange you should eat today (half—one of two equal parts). Ask them how you should divide it in half (across the middle), and ask them divide their first circle by drawing a line. Then ask them how much orange you can eat today if you need to make it last for four days. (one fourth – one of four equal parts). Ask them to draw this on their second construction paper circle cutout.

Take the orange out of your desk and tell them that actually, you’ll be able to buy a new orange to eat on the fourth morning. It’s just three days that this orange has to last. Ask how much orange you can eat today.

Divide the orange into three equal portions, and tell the class that they are called thirds. Tell them that when you are making thirds out of a circle there’s no middle line to divide on. Show them, or draw on the backboard, a picture of an orange cross section cut into thirds; demonstrate how you can start by making a line through the middle, to the center point, and then continuing it as a (wide mouth) Y.

orange_slicethird

Ask your students to draw lines and divide their last construction paper circles into thirds. Have them cut out the segments and lay them over each other to check their own work.

Now tell them to take out their first rectangle, and tell them you’d like this to be divided into thirds. Ask them how they would go about it.

After they have had plenty of time to experiment call up any students who have been especially successful to show their techniques. If they are all still fumbling, show them your rectangle, creased to show thirds. Give them a chance to imitate this with their own paper, and have the first successful student show them how folding the two sides over the middle segment and creasing the fold will give three equal sections— three thirds.

Ask which is larger, a half or a third. And which is smaller, a fourth or a third.

Give each student a pile of twelve beads, tiles, or other math manipulatives, and ask them to divide it into thirds. Let them try to figure this out by themselves before you give them any input. You can continue this exercise to halves and quarters.

When your students feel comfortable making divisions in halves, thirds, and quarters, it’s time to go on to strange looking equivalences. If your students had forgotten some of their first grade work, you may want to simply spend the rest of the class period playing with fractions and save this second half of the lesson till your next class. If your students had no difficulties with your preliminary exercises, though, you can go straight on.

Ask the students to divide their second rectangle in halves. Choose two students who have halves that are proportioned differently, and have them show their halves to the class. Ask which is larger.

If there is the slightest doubt in anyone’s mind, point out how, though one is wider, the other is taller. Demonstrate equivalence by cutting and taping the rectangles till they become the same size and shape. Only after you have demonstrated it tell them that half of an object is always the same size as any other half of the same object, no matter what shape it takes. You don’t want them to accept this as a rule for how halves should behave, but simply as a demonstrated fact.

Provide each student with three more identical rectangles, pre-cut out of three different colors of construction paper. Ask the students to draw lines to partition each rectangle in fourths, and tell them you’d like the partitions to be different in each rectangle.

Give the students the attached worksheet and ask them to mark the areas that are equivalent.


Download Lesson Plan

adobe_pdf-116x150


Common Core Standards

In 2.G.3, 2nd grade geometry item 3, the Common Core State Standards for Mathematics reads:

2.G.3 Partition circles and rectangles into two, three, or four equal shares, describe the shares using the words halves, thirds, half of, a third of, etc., and describe the whole as two halves, three thirds, four fourths. Recognize that equal shares of identical wholes need not have the same shape.

Web Resources/Further Exploration

You may also want to point your students to some of our other fractions resources and links:

Common Core Standard 6.RP.A.3 Lesson Plans

In (6.RP.A.3), the Common Core State Standards for Mathematics reads ‘Use ratio and rate reasoning to solve real-world and mathematical problems, e.g., by reasoning about tables of equivalent ratios, tape diagrams, double number line diagrams, or equations.’

  • CCSS.MATH.CONTENT.6.RP.A.3.A
    Make tables of equivalent ratios relating quantities with whole-number measurements, find missing values in the tables, and plot the pairs of values on the coordinate plane. Use tables to compare ratios.
  • CCSS.MATH.CONTENT.6.RP.A.3.B
    Solve unit rate problems including those involving unit pricing and constant speed.For example, if it took 7 hours to mow 4 lawns, then at that rate, how many lawns could be mowed in 35 hours? At what rate were lawns being mowed?
  • CCSS.MATH.CONTENT.6.RP.A.3.C
    Find a percent of a quantity as a rate per 100 (e.g., 30% of a quantity means 30/100 times the quantity); solve problems involving finding the whole, given a part and the percent.
  • CCSS.MATH.CONTENT.6.RP.A.3.D
    Use ratio reasoning to convert measurement units; manipulate and transform units appropriately when multiplying or dividing quantities.

Lesson Plans on this Topic:

Unit Rate and Proportional Reasoning Lesson Plan 6th Grade

Discussion/Introduction

An understanding of proportional reasoning is not only important for later mathematical understanding of linear equations but is also a key math skill used in life. I’ve found that students respond better when there are multiple senses involved. As an anticipatory set for this lesson, which may be revised to fit your ingredient list, it is nice to involve taste buds and eyesight. The heart of this lesson plan is connecting function tables (without the use of technical math language yet) with single quadrant , coordinate grid , graphing.   Download lesson at bottom of page.

Objective

Learning Objective/Goals

  • Students will understand that unit rate means “rate for just one”.
  • Students will be able to complete basic function tables.
  • Students will be able to use a coordinate grid to plot equivalent ratios and will be able to see that the result is linear.
  • Students will understand that graphs showing proportional relationships (direct variation) pass through the origin.

Supplies

Supplies Required

  • 3 large clear glasses (larger than 2-cup size)
  • Food coloring (fairly potent color)
  • Stirring stick
  • Supplies for each group of 4:
    • 12 mini cups (Dixie cups)
    • 2 pints of milk
    • 3 scoops of Nesquick (or other powdered chocolate milk mix—may alter steps slightly) (this should allow a little extra per group)
    • 1 scooper (could be measuring spoons instead if same size as in container)
    • 1 stirring stick
    • 1 clear 1-cup measuring cup
  • Intro to Proportional Reasoning Worksheet
  • Running Frenzy Worksheet
  • Proportional Reasoning Practice Page

Methodology/Procedure

Methodology

Anticipatory Set #1 (Colored Water)

  1. Have three large clear glasses at the front of the room on display. They can all be the same size and ideally are unmarked.
  2. Start off by filling one glass with 2 cups of water.
  3. Put 40 drops of food coloring (make sure it is a fairly potent color) into the glass. Lightly stir.
  4. Ask the students what they see and record the action that just took place in a table. They have the same table on their “Intro to Proportional Reasoning” Worksheet (The _sample_printable1 file that you can download at the bottom of this page).
  5. Fill a second glass with 1 cup of water.
  6. Ask the students the following questions in a full class discussion:
    • How does the amount of water in this second glass compare with the amount of water that we put in the first glass?
    • If we want both glasses of water to be the same color, how many drops of food coloring should we put in the glass?
    • How did you make this decision?
  7. Put 20 drops of food coloring (same color as used in last glass) into the glass. Lightly stir.
  8. Ask the students what they see and record the action that just took place in a table. They have the same table on their “Intro to Proportional Reasoning” Worksheet.
  9. Fill the third glass with ½ a cup of water.
  10. Ask the students the following questions in a full class discussion:
    • How does the amount of water in this third glass compare with the amount of water that we put in the second glass?
    • If we want both glasses of water to be the same color, how many drops of food coloring should we put in the glass?
    • How did you make this decision?
  11. Put 10 drops of food coloring (same as color used in last two glasses) into the glass. Lightly stir.
  12. Give students a few minutes to fill in their tables and answer the follow up reflection question.


Anticipatory Set #2 (Chocolate Milk)

  1. Break students into groups of 4 and pass out the following supplies:
    • 12 mini cups (Dixie cups)
    • 2 pints of milk
    • 3 scoops of Nesquick (or other powdered chocolate milk mix—may alter steps slightly) (this should allow a little extra per group)
    • 1 scooper (could be measuring spoons instead if same size as in container)
    • 1 stirring stick1 clear 1-cup measuring cup
  2. Inform them that recipes are written for a reason. They are a statement of ratios. They define how much of one ingredient should be mixed with another ingredient to create a specific flavor. If recipes are not followed, a different flavor is created.
  3. Have each student take their 3 mini cups label them in the following way:
    • 8 oz/1 scoop
    • 4 oz/0.5 scoops
    • 8 oz/0.5 scoops
  4. Have the students make an 8-oz serving of milk mixed with 1 scoop of Nesquick. Make sure it is measured carefully and stirred well. Pour a small amount of this mixture into the “8 oz/1 scoop” cup.
  5. Have the students make a 4-oz serving of milk mixed with ½ scoop of Nesquick. Make sure it is measured carefully and stirred well. Pour a small amount of this mixture into the “4 oz/0.5 scoop” cup.
  6. Have the students make an 8-oz serving of milk mixed with ½ scoop of Nesquick. Make sure it is measured carefully and stirred well. Pour a small amount of this mixture into the “8 oz/0.5 scoop” cup.
  7. Have students taste their three mixtures and then decide which two taste the same and which one tastes different. Discuss with the class why one tastes different than the others.
  8. Have the students write down the rule for each of the three mixtures on the table (“Intro to Proportional Reasoning” Worksheet).
  9. Have the students cross out the one that does not have the same rule as the others.
  10. Have students find 4 more combinations of Nesquick to milk that would result in the same flavor (in other words has the same rule or is proportional).
  11. Give students a few minutes to fill in their tables and answer the follow up reflection question.


Running Frenzy Worksheet

  1. Pass out the “Running Frenzy” Worksheet for students to complete in groups of 4. I recommend checking in every 5-10 minutes for accuracy and shared thinking.


Proportional Reasoning Practice Page

  1. For in-class practice, pass out the “Proportional Reasoning Practice Page.”
  2. Homework/At-home review could be further work on function tables and graphing proportional relationships.

Download the Lesson plan

adobe_pdf-116x150

Common Core Standards

Common Core Standards Addressed

CCSS.MATH.CONTENT.6.RP.A.3
Use ratio and rate reasoning to solve real-world and mathematical problems, e.g., by reasoning about tables of equivalent ratios, tape diagrams, double number line diagrams, or equations.

CCSS.MATH.CONTENT.6.RP.A.3.A

Make tables of equivalent ratios relating quantities with whole-number measurements, find missing values in the tables, and plot the pairs of values on the coordinate plane. Use tables to compare ratios.

Web Resources/Further Exploration

Web Resources

Online Graph Paper Maker

Understanding Circumference and Area of a Circle Lesson Plan 7th Grade

Discussion/Introduction

This is the third lesson in a series on circles. It follows the Elements of a Circle Lesson Plan 7th Grade and the Understanding Pi Lesson Plan 7th Grade. When all three lessons are done, students should have a firm understanding of what makes a circle, what pi represents, and how to find the area and circumference of a circle. This lesson does require that students are comfortable with pi and does allow for differentiation and writing.

Objective

  • Students will understand that pi is the ratio .
  • Students will be able to find the area and circumference of a circle.
  • Students will understand the connection between the area of a square and the area of a circle.

Supplies

    • “The Ripple Effect” Worksheet
    • Calculators
    • Scissors (1 pair per group of 4)
    • Glue stick (1 per group of 4)
    • 3 different colored sheets of square paper (origami paper works well) per group of 4 students
    • “Area of a Circle” Worksheet
    • Student’s Circle Foldables from the last two sessions (started in Elements of a Circle Lesson Plan 7th Grade)

Methodology/Procedure

Understanding Circumference

  1. At this point, students should understand the following points. If this lesson is being done on a different day, I recommend reviewing these key points before beginning the day’s lessons. All information should be found on the students’ foldables.
    1. Circumference is the distance around a circle.
    2. The diameter is the distance across the circle, passing through the center.
    3. The radius is the distance from any point on the circle to the center.
    4. Diameter is two times the radius.
    5. Pi is the ratio .
    6. Pi can be approximated to 3.14.
  2. Get students into collaborative groups of 4 students and pass out “The Ripple Effect” Worksheet. Note that the first 2 pages are very guided. The numbers may require calculators yet it is still scaffolded. The last two pages may be used as either enrichment or as a follow up homework/family involvement assignment.
  3. Add the circumference information to the Circle Foldable.
  4. Homework/Review for this session can be a worksheet on circumference.

Understanding Area of a Circle

  1. Have students stay with their foursome from the previous activity.
  2. Pass out 3 congruent square sheets of paper in different colors to each group, a pair of scissors, and a glue stick.
  3. Have 1 student from the group fold one sheet in half and then in half again (“snowflake fold”). From this point, have the student cut the shape of a quarter circle. Be careful that they cut off the “open flap” side. This needs to be the biggest circle possible so the arc will go to both corners. Recommend that they really cut wide or the circle will be misshaped. You will want some extra sheets on hand. Glue this circle on top of the square with the folds horizontal and vertical. (Included is a sheet with images for the Square/Circle/Diamond Cut Outs.)
  4. Have another student fold the third sheet in half and then in half again (“snowflake fold”). From here have the student cut from one corner to its diagonal corner. Be careful that they cut off the “open flap” side. This should form a diamond/rhombus/square. Glue this diamond on top of the circle with the folds horizontal and vertical.
  5. Lead a short class discussion on the shapes and recap their properties.
  6. Have another student cut the large shape into four equal parts. Each student will get one part.
  7. As a class discussion, ask the following questions:
    1. What shape do we have on the bottom?
    2. If the square represents our whole, what fraction of the whole is the triangle? How do you know?
    3. Does the quarter circle have a greater or smaller area than the triangle? How do you know?
    4. Since the quarter circle has a greater area than the triangle, is it greater than or less than ½ of the area of the square?
    5. Does the quarter circle have a greater or smaller area than the square? How do you know?
    6. Since the quarter circle has a smaller area than the square, is it greater than or less than 1 of the area of the square?
    7. Can we put that into the form of a compound inequality? The quarter circle is greater than _________ of the square but less than __________ of the square.
  8. Pass out the “Area of a Circle” Worksheet: Have students work as a group on the first half. Lead a class discussion for the back side.
  9. As a summation for the day, have students add information about the area of the circle to their Circle Foldables.
  10. Homework/Review for this session can be a worksheet on the area of a circle.

adobe_pdf-116x150

Download Lesson and Printables


Common Core Standards

CCSS.MATH.CONTENT.7.G.B.4

  • Know the formulas for the area and circumference of a circle and use them to solve problems; give an informal derivation of the relationship between the circumference and area of a circle.

Addresses all 8 Standards for Mathematical Practice

Understanding Pi Lesson Plan 7th Grade

Discussion/Introduction

This is a second lesson on circles. If you feel as if your students need an initial lesson on radius and diameter , please refer to Elements of a Circle Lesson Plan 7th Grade  ; otherwise, this can be a standalone lesson if you are looking for a one-day hands-on activity. I like to follow it up with the lesson on Area and Circumference of a Circle to allow more practice and to embed opportunities for deeper reasoning about circles. When all three lessons are done, the entire 7th grade standard for circles is addressed.
Download Lesson Plan

Objective

  • Students will understand that pi is the ratio circumference: diameter.

Supplies

    • 1 traceable circular item (mug, lid, pot, etc.) per student (ideally -8 in diameter) (Students will be working in groups of 4-5 students. No member of a group should have the same sized item.)
    • A piece of yarn (2 ½ feet long) per student
    • Scissors
    • Glue sticks
    • 1 sheet of colored card stock or construction paper per student
    • A ruler that shows centimeters (Students may share but I recommend no more than 2 students per ruler.)
    • Calculators
    • “Investigation of Pi” Worksheet (available as part of the download with this lesson plan)
    • Student’s Circle Foldable from the Elements of a Circle Lesson Plan 7th Grade

Methodology/Procedure

  1. Break students into groups of 4-5 students. Pass out 4-5 (depending on group size) traceable circular items (lids, mugs, pots, etc.) to each group. To make resources easier, do not use items that have larger than an 8” diameter. Also pass out the “Investigation of Pi” Worksheet, a pair of scissors, and a length of yarn (a little longer than the circumference of the largest item) to each student.
  2. Have each student trace one of the items onto a colored sheet of paper or construction paper. They will then cut out their circle and fold it in half two times to approximate a center point. This will be necessary to find the diameter.
  3. From here they will use their length of yarn and wrap it around the item. They will then cut the yarn to the best of their ability to represent the distance around the item.
  4. They will then fill in the data for row #1 on their “Investigation of Pi” Worksheet. They will need a calculator.
  5. Have students rotate their worksheets allowing each student to fill in the data for each circle at the table. Students may find that they need to cut yarn pieces again, so have extra on hand.
  6. As a class, share out responses and observations.
  7. Have each student answer the questions on page 2 of the “Investigation of Pi” Worksheet. Stress the importance of responding in complete sentences.
  8. Give the class 10 minutes or so to assemble their circles into posters and to decorate them. They should attach their chart as evidence/justification to the circle.
  9. As a final summation of the day, have the students complete the next section (Pi) on their Circle Foldable from the Elements of a Circle Lesson Plan 7th Grade.

Here’s a snippet of the “Investigation of Pi” Worksheet that is available as part of this download. It also has a set of reflection questions on the back to help the students understand pi.

Investigation of Pi Screenshot


Download Lesson

adobe_pdf-116x150

Common Core Standards

CCSS.MATH.CONTENT.7.G.B.4

Know the formulas for the area and circumference of a circle and use them to solve problems; give an informal derivation of the relationship between the circumference and area of a circle.

Addresses all 8 Standards for Mathematical Practice